“`html
What the FAA Considers Airworthy for Your Mini 4 Pro
Drone compliance has gotten complicated with all the regulatory noise flying around. I’ve been flying Part 107-registered drones for five years now, and I can tell you the single biggest compliance mistake pilots make involves propeller damage. They see a tiny nick, think “it’s fine,” and launch anyway. Then they fail the pre-flight inspection question on their remote pilot exam or worse—get flagged during an FAA spot check.
The FAA defines airworthiness in 14 CFR § 107.9. A drone must be in a condition for safe operation. That’s the legal standard. Not “probably fine.” Not “still flies straight.” Safe operation.
For the DJI Mini 4 Pro specifically, this means your propellers must meet the manufacturer’s specifications for structural integrity. The Mini 4 Pro’s propellers are plastic composites—approximately 8.3 inches in diameter—designed with precise weight distribution and blade geometry. Any deviation from factory specifications is technically a deviation from the airworthiness certificate DJI obtained from the FAA. But it’s much more than that.
Part 107 exam candidates see this tested as: “Which of the following would require an aircraft to be removed from service?” The answer involves propeller damage. Not because one nick will make you crash. Because the FAA’s regulatory framework requires you to maintain airworthiness as a documented condition, not a guess.
Probably should have opened with this section, honestly. Most pilots I’ve trained care about airworthiness only after they understand their legal exposure. Understanding the regulation first—that’s what makes compliance endearing to actual Part 107 operators. It shifts everything.
Visual Inspection Steps for Propeller Damage
You can perform this inspection in your garage with nothing but good lighting and ten minutes.
Start with the propeller still mounted on the drone. Look down the blade edge from the motor forward. Any blade warping—visible bending that changes the blade’s curve—disqualifies it immediately. The Mini 4 Pro’s propellers have a specific airfoil shape. If light reflects unevenly across the blade surface, you’ve got warping.
Next, remove each propeller by twisting counterclockwise. The DJI Mini 4 Pro uses a quick-release mechanism — at least if you want to avoid stripping the threads. Hold the motor shaft with one hand, twist the propeller with the other. Look for these specific issues:
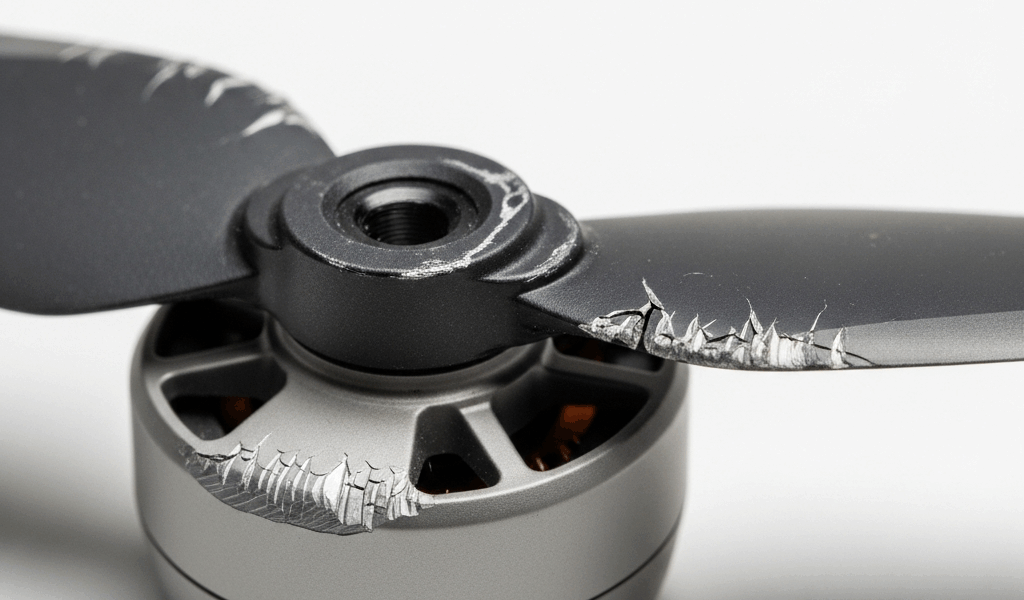
- Hairline cracks — Hold the blade up to a bright light. Any crack running along the blade spine or radiating from the motor collar means replacement. Even a crack that doesn’t penetrate the full blade thickness is structural failure waiting to happen under vibration.
- Material separation — The Mini 4 Pro blades use a composite material with layers. If you see the layers separating—particularly visible at the blade tip or edges—the blade is compromised. Run your fingernail along the edge. Smooth edges are fine. Peeling or chunking means damage.
- Paint chips versus structural damage — Here’s where people get confused. The blades have a glossy coating. Small paint chips, under 2mm, are cosmetic only. But if the chip is deep enough that you can see the gray composite material underneath and the edges feel rough rather than smooth, that’s structural.
- Balance issues — After you’ve checked for visible damage, mount the propeller on a balancer. The DJI Mini 4 Pro propellers weigh approximately 1.5 grams each. If one propeller is more than 0.1 grams heavier or lighter than its opposite pair, it should be replaced. An unbalanced propeller causes vibration, which ages other components faster and violates the “condition for safe operation” standard.
- Motor collar damage — The part where the propeller connects to the motor. If the connection point has cracks, is stripped, or doesn’t seat flush when properly installed, the propeller can’t be secured safely.
Document your inspection. Take photos. This documentation matters if the FAA ever asks you to prove pre-flight procedure compliance. You need to show you actually looked, not just assumed.
When Damage Means Grounded Under FAA Rules
The line between “still legal” and “violates Part 107” is not where most pilots think it is.
A propeller with a small paint chip and no structural damage is airworthy. Fly it. A propeller with visible blade warping is not airworthy. Don’t fly it. Between those extremes, you need a decision framework.
The FAA test banks include this actual question pattern: “A remote pilot observes a small crack in a propeller blade. The aircraft will still fly to altitude and function normally. What action must the pilot take?” The correct answer is remove the aircraft from service. The reason given in official FAA materials is that continued operation creates a risk condition that violates the airworthiness requirement.
Here’s the operative language from 14 CFR § 107.9: “No person may operate a small unmanned aircraft unless it is in a condition for safe operation.” That “for safe operation” phrase is doing the work. Not “probably safe.” Not “functionally safe.” Safe for operation under the normal conditions you’re about to encounter.
Structural damage—cracks, warping, material separation, balance issues—requires grounding. Cosmetic damage does not. If you’re uncertain whether something is cosmetic or structural, assume structural. That’s the conservative position that keeps you compliant.
I made this mistake early on with a DJI Mavic 2 Pro. I had a hairline crack I thought was cosmetic. I flew a 90-minute survey mission. Halfway through, vibration began, and I landed early. The crack had propagated. Later inspection showed the blade had tiny fractures running through it. I should have replaced the propeller immediately rather than rationalize why it looked safe. Don’t make my mistake.
Legal Repair and Replacement Options
You cannot repair propeller blades. Period. The FAA does not permit field repairs on structural components of the aircraft. This includes glueing cracks, sanding damage, or filling gaps. Any repair is grounds for declaring the aircraft not airworthy.
Your only legal option is replacement with propellers that meet original manufacturer specifications. That’s it.
DJI offers genuine Mini 4 Pro propellers through their official store and authorized retailers. A set of four costs approximately $12 to $17 USD depending on the retailer. The part number is 2250mAh Intelligent Flight Battery replacement propellers, or the specific model designation 7238 propellers — they’re used across several DJI models. Order these directly from DJI, from B&H Photo, or from Amazon if the seller is verified as DJI-authorized.
Third-party propellers exist. Some are fine. Some are not, honestly. The problem is liability and documentation. If you use third-party propellers and the FAA asks you to prove the aircraft was maintained to airworthiness standards, you need documentation showing those propellers meet DJI’s specifications. Most third-party manufacturers don’t provide that documentation because they’re not FAA-regulated. I’m apparently skeptical of knockoff parts and DJI works for me while cheaper alternatives never do. That $5 savings isn’t worth the regulatory risk.
Document the replacement. Keep the receipt. Note the date, part number, and reason for replacement in a maintenance log. This log is your evidence of proper airworthiness maintenance if ever needed.
Pre-Flight Checklist for Propeller Integrity
Part 107 requires a pre-flight inspection. Most pilots do a cursory walk-around. That’s insufficient for regulatory compliance.
Your propeller inspection should be documented and systematic. Before every flight:
- Remove each propeller and visually inspect both sides of each blade under bright light. Rotate the blade in your hand. Look for cracks, warping, and material separation.
- Feel the blade edges. They should be smooth. Roughness indicates damage.
- Check the motor collar connection. Ensure it’s clean and the propeller seats flush when installed.
- Reinstall propellers. They should click and lock securely. If they feel loose or require excessive force, remove and check the threading on the motor shaft.
- Manually spin each propeller by hand before powering on. They should rotate freely without wobbling or resistance changes midway through rotation.
- Power on the aircraft. In the DJI Fly app, verify all four motors activate smoothly without grinding sounds or unusual vibration.
- Document this inspection. Note the date, time, and any issues observed. Write “Propeller inspection—no damage noted. Aircraft cleared for operation” or similar language.
This process takes five minutes. It’s what Part 107 exam candidates are tested on under the “preflight inspection” section of the knowledge exam. It’s not optional. It’s the published standard pilots must follow.
If you ever find propeller damage during this inspection, your only airworthy action is to replace the propellers before flight. Not after. Before. The regulation is clear on this point, and the FAA enforces it consistently.
Your DJI Mini 4 Pro will fly reliably for years if you maintain it to airworthiness standards. That maintenance starts with honest propeller inspection and immediate replacement when damage appears. The $15 in propellers and five minutes of inspection time is the cost of staying legally compliant under 14 CFR § 107.9. So without further ado, make it part of your routine.
“`

Stay in the loop
Get the latest dronefaaregulations updates delivered to your inbox.